pixFront
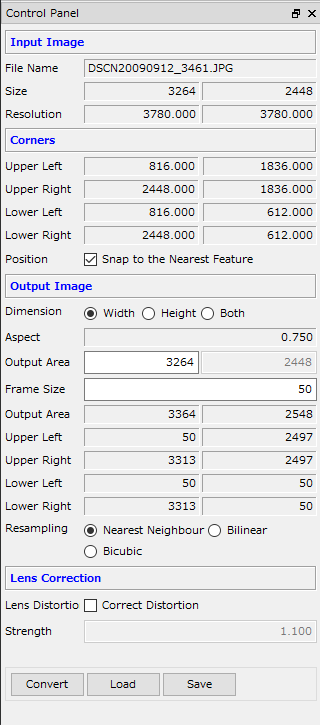
Input Image
In this area, some basic information about the currently loaded image is shown.
Corners
As the four corners are selected on screen, their coordinates are displayed in this area. The coordinates cannot be edited here.
Position: If 'Snap to the Nearest Feature' is checked, when the mouse button is released, pixFront detects a corner in the scope and automatically snaps to that point.
Note: If the corner is not clearly visible on the image, snapping may not work properly. In this case, uncheck this setting and move the center of the scope manually to the exact position of the corner.
Output Image
Based on the coordinates of the four corners selected on the image, the aspect ratio (height/width) of the rectangular area is estimated and shown as 'Aspect'.
Dimension: The size of the output image (in terms of
pixels) is specified in one of the following three ways:
[1] Width --- The user specifies the width of the output image and the height is determined from the aspect ratio.
[2] Height --- The user specifies the height of the output image and the width is determined from the aspect ratio.
[3] Both --- The user specifies both width and height of the output image.
Frame Size: The width of the area to be added outside the selected rectangular area, given in pixels.
The size of the output image and the coordinates of the
four corners are calculated and displayed in the area below.
Resampling: By selecting 'Nearest Neighbor', 'Bilinear' or 'Bicubic', the generated image will look smoother and cleaner, but the transformation takes longer.
Lens Distortion
If the edge of the transformed rectangular area is significantly curved inwards or outwards, check the 'Correct Distortion' setting to try and remove the distortion. Usually, this correction is not necessary.
Strength: Enter the intensity of the distortion correction as a real number. If you observe that the edge of the rectangular area is curved outwards in the transformed image, try a value slightly lower than 1.0. If it is curved inwards, try a value slightly higher than 1.0.
Note that this does not geometrically correct the image, but it simply adds radial distortion to cancel the curvature at the edge. The distortion is relatively large, for example, when shooting a large area from a short distance.
Navigate to 'File' and select 'Properties'. Here you can
modify the following properties:
- Tag Color: the color of the rectangle corners on screen.
- Tag Selection Range: the radius of the scope as drawn on the screen.
- Segment Color/Segment Width: the color and width of the line for the
selected area.
- Re-sample: sets whether the image is smoothed or not, as it is displayed
on screen.